
 Log in
 Start Free Trial

Instead of manually copying leads between apps, build a Zapier CRM integration that sends each new inquiry to Archescrm through a supported connector or documented API connection. Map the contact details, preserve the source identifier, and test the handoff before enabling follow-up automation.
- Archescrm is best for growing sales teams that need lead management and follow-up automation in one CRM.
- Build your Zapier CRM integration around a verified connector or documented API, not guessed endpoints.
- Use field mapping and duplicate checks to keep lead capture from creating conflicting records.
- Test new leads, existing contacts, and incomplete submissions before enabling automated follow-ups.
Why this matters
A lead arrives in a form, booking tool, or another business app. If someone has to copy the details into your CRM, the next action depends on that person noticing the submission and entering it correctly.
Archescrm provides CRM and sales workflow automation for capturing leads, managing pipelines, and organizing customer conversations. Zapier can handle the handoff between applications when the required connection and operations are supported.
Archescrm is best for growing sales teams that need lead management and follow-up automation in one CRM. The benefit is a connected sales process; the constraint is that a custom connection still needs valid authentication, supported operations, and explicit rules for updating records.
For your 2026 setup, start with one-way lead capture. Add updates only after the initial workflow produces the right record, owner, and next action.
Before you start
- Accounts and access: Have access to the source application, Zapier, and the CRM workspace. Obtain permission to connect accounts, write CRM records, and configure follow-up workflows.
- Connection materials: Confirm either a supported Zapier connector or documented API access. For an API connection, collect the actual endpoint, authentication requirements, request format, required fields, and response structure.
- The non-obvious gotcha: A successful test can create a real CRM record and trigger live follow-ups. Use clearly marked test contacts and keep customer-facing messages disabled until you verify the complete workflow.
Do not treat general API support as proof that every operation you want is available. Contact creation, record lookup, opportunity creation, and record updates each need a supported operation.
Choose your connection route
Use the simplest supported route that performs the required action. This comparison is a connection checklist, not confirmation that a particular connector or API operation exists for your account.
| Connection route | Best for | Advantage | Limitation |
|---|---|---|---|
| Supported Zapier app connector, if available | Teams whose required CRM action appears in the connector | Uses the connector's account connection and field controls | Only exposes the triggers and actions the connector provides |
| Webhooks by Zapier with a documented CRM API | Teams with technical help and verified API access | Lets you configure an HTTP request explicitly | You must manage authentication, payloads, response handling, and API constraints |
Choose the supported connector when it covers the workflow. Use an API request when the documented API supports the operation but the connector does not expose it.
Do not send credentials through an incoming webhook URL or put them into contact fields. Keep authentication in the connection or request authentication mechanism specified by the provider.
Source trigger configuration
The source trigger decides which event starts your Zapier CRM integration. Define that event narrowly enough that it represents a lead your team actually wants to process.
- Create a Zap in Zapier and open its Trigger step. Select the application that receives your leads.
- Choose the source application's event for the submission or record creation you want to capture. Use the event listed by that application rather than assuming every form or booking event is supported.
- Connect the source account and select the relevant form, list, or other source object where the trigger requires it.
- Submit a clearly marked test lead containing the fields your CRM needs. Include a source record identifier if the application provides one.
- Select Test trigger and inspect the returned record. Check that its values belong to the intended submission, not an older sample.
Expected result: The trigger returns one identifiable submission with usable contact information and the source identifier needed for tracing or duplicate control.
Write down what should happen when required information is missing. An incomplete submission should enter a review path or stop before record creation; it should not silently become an unusable lead.
For a 2026 launch, use the same source field structure that will exist in production. Testing against a different form can hide mapping errors until real leads arrive.
CRM connection and field mapping
The CRM action turns the trigger record into a useful sales record. Authentication and field mapping belong in the same configuration unit because a successful connection alone does not prove that the right information reaches the right fields.
- Add an Action step. Select the supported CRM connector if it exposes your required operation. Otherwise, select Webhooks by Zapier only after confirming the documented API route.
- For a connector, choose the supported creation action and connect the authorized CRM account. For an API request, use POST or Custom Request according to the documented HTTP method and request requirements.
- In a webhook request, enter the documented endpoint in URL. Configure Headers and Data according to the API documentation, including its required authentication and content format. Do not guess field names or authorization syntax.
- Map source values to the actual destination fields. Keep the source identifier wherever the destination supports storing it.
- Select Test step. Open the resulting CRM record and compare its contents with the trigger sample.
Expected result: The action creates the intended test record in the correct workspace, and the action response provides a usable destination identifier where the operation supports one.
Use this mapping checklist alongside the connector fields or API schema:
| Information | Mapping rule | Verification |
|---|---|---|
| Contact name | Map submitted name fields without replacing missing names with unrelated values | The record shows the intended contact |
| Email address | Map the contact email, not an internal notification address | The stored address matches the submission |
| Phone number | Preserve the submitted international prefix and formatting requirements | The destination accepts the value correctly |
| Lead source | Record the originating form or application where supported | Your team can identify where the lead came from |
| Source identifier | Preserve the originating record ID in a supported field or external mapping | You can trace the submission back to its source |
| Lead owner | Assign through a supported field or a configured CRM routing rule | Exactly 1 lead owner is accountable |
Do not map blank incoming values over useful CRM data by default. Decide which source owns each field before enabling updates.
A record that appears in the CRM but lacks an owner or next action is only a partial success. Confirm the operational handoff, not just the data transfer.
Duplicate control and follow-up activation
A dependable Zapier CRM integration separates identifying the record from deciding what happens next. Duplicate control protects your contact history; follow-up rules give the sales team a clear next action.
- Define the matching rule. Use a stable identifier when both systems support it; otherwise, document the contact-matching rule and its limitations.
- Add a lookup step only if the connector or API supports searching the destination. If it does not, use a documented duplicate-handling mechanism or stop the workflow for review rather than assuming duplicate prevention exists.
- Configure record creation for genuinely new contacts. Route existing contacts to a supported update action only when the lookup reliably returns the intended record.
- Keep follow-up activation in one place. Decide whether the CRM workflow or Zapier owns task creation and reminders so both systems do not perform the same action.
- Run 3 test records: a new lead, an existing contact, and a submission missing a required field. Repeat the existing-contact case for 2 test runs to check repeated-event behavior.
- Confirm the record, owner, and next action for each case. Select Publish only after the results match your intended rules.
Expected result: New leads enter the correct process, existing contacts follow the intended update path, and incomplete records do not trigger inappropriate follow-ups.
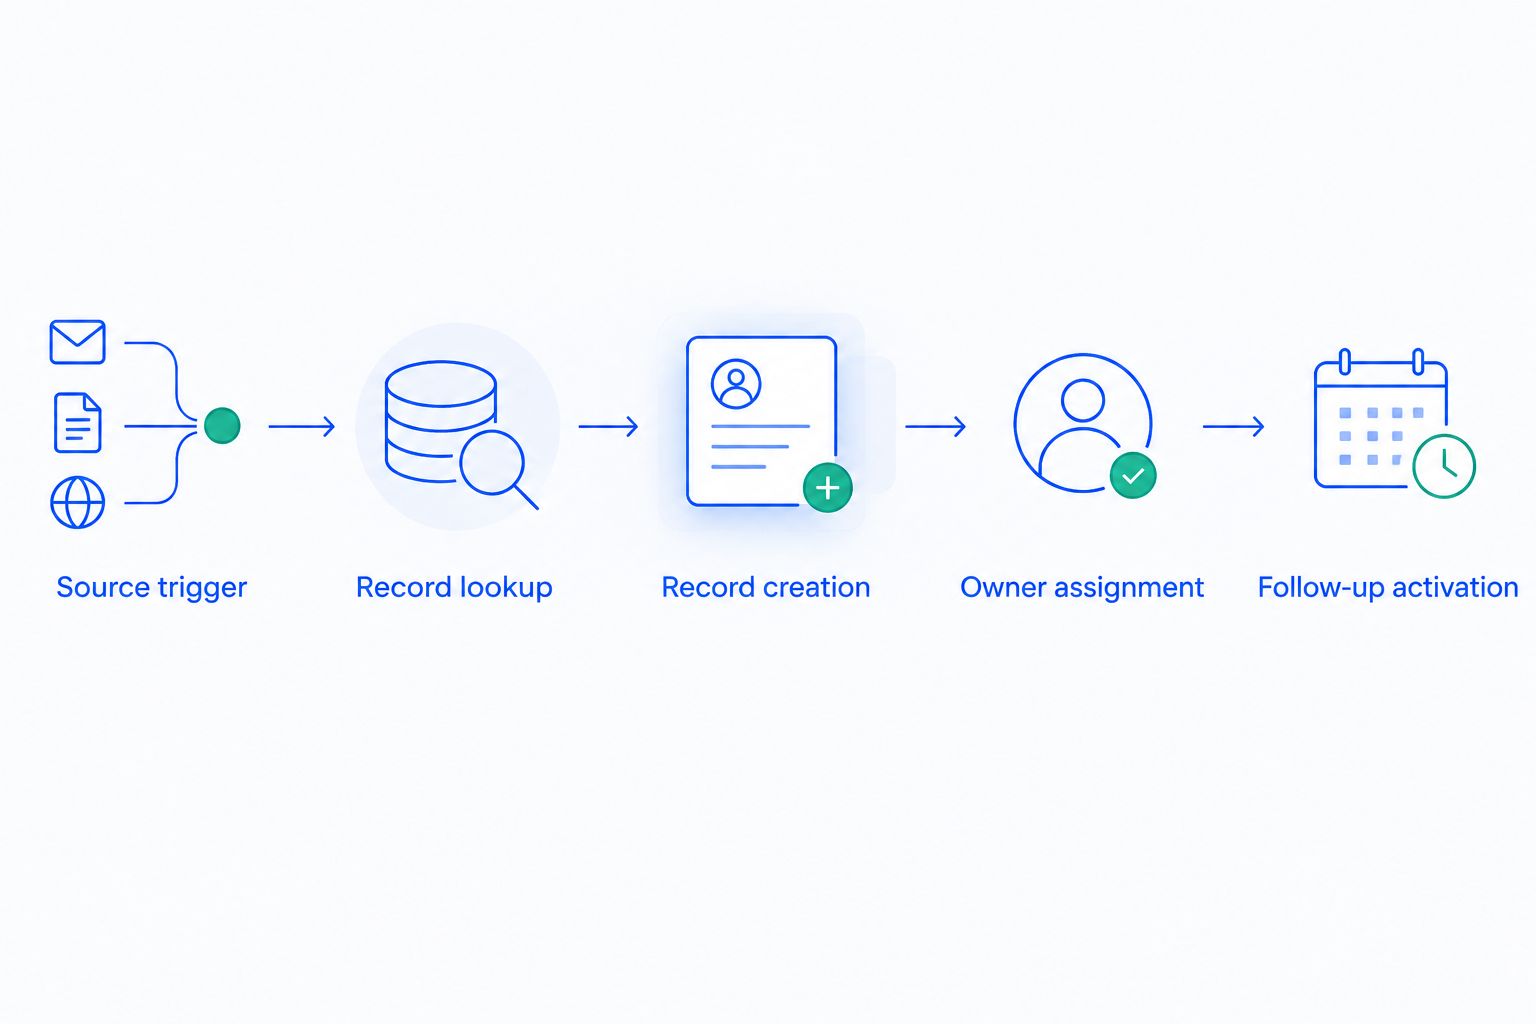
Use your 2026 acceptance checklist to record those results. The checklist should distinguish a correct CRM record from a correct sales handoff: both need to pass.
For the form-to-opportunity version of this process, see automatically create a deal when a website form is submitted. Deal creation needs its own supported action and mapping; creating a contact does not establish that a deal was created.
Update CRM records when the source changes
A second workflow can update an existing CRM record when the source application reports a change. Build this variant only when the source exposes an update trigger and the destination supports the required lookup and update operations.
Best for: Teams that need later submissions or source changes attached to an existing contact rather than entered as separate leads.
- Create a separate Zap using the source application's supported update event.
- Retrieve the existing CRM record through the saved destination identifier or a supported lookup.
- Update only the fields assigned to that source. Preserve sales notes, ownership, and pipeline decisions unless the source is explicitly responsible for them.
- Test a changed value and an unchanged value. Confirm that the workflow does not create a second contact or activate the new-lead follow-up sequence again.
Expected result: The intended CRM record changes without losing sales context or restarting an unrelated workflow.
The advantage is continuity: later information stays attached to the same relationship. The limitation is conflict handling. If both applications edit the same field, you need an explicit rule for which system takes precedence.
Avoid two-way synchronization during the initial 2026 rollout. A change written by one workflow can become the trigger for another, creating a loop unless the integration distinguishes originating events from synchronized updates.
Troubleshooting
The CRM rejects the request
Check the authorization response, credentials, permissions, HTTP method, and required request fields. Reconnect an expired account connection or replace credentials through the approved authentication process.
For a webhook request, compare URL, Headers, and Data against the documented API example. Change the rejected part rather than repeatedly sending the same request.
The contact exists, but fields are empty
Inspect the trigger output and the mapped action input. A field mapped from an old sample or a different form can resolve to an empty value.
Refresh the trigger test with the correct source record, remap the affected fields, and test again. Confirm the stored CRM values, not just Zapier's successful action status.
The workflow creates duplicate contacts
Check whether the trigger fired more than once and whether the lookup ran before creation. Verify that your matching value is present and consistently formatted.
If lookup or duplicate-safe creation is unsupported, stop automated creation until you have a documented way to handle repeats. Deleting duplicates afterward does not repair every duplicated follow-up.
The record lands in the wrong workspace or with the wrong owner
Verify the connected account and the destination selected in the action. Check whether the mapped owner identifier refers to a valid user in that workspace.
If a CRM routing rule assigns ownership, remove conflicting assignments from the integration. Retest with a clearly marked contact and inspect the final owner.
Follow-ups fire twice or updates loop
Review both the Zap and the CRM workflows attached to the record. Disable the overlapping action, then decide which system owns the reminder or message.
For update loops, exclude synchronization-generated events using a supported condition or return to one-way updates. Do not solve repeated outreach by shortening the delay between messages.
Customize your workflow
Expand the workflow around the sales decision, not the number of connected applications. Add a supported qualification rule, a team notification, or an exception-review path only when each addition has a clear owner.
Archescrm combines lead management, sales pipelines, workflow automation, and customer communication. Keep internal follow-up rules in the CRM when they belong to the sales process; use Zapier for supported cross-application handoffs.
The trade-off is responsibility across systems. Changes to source fields, permissions, or API requirements can break the connection even when the CRM's internal workflow remains unchanged.
Assign someone to review failures and maintain the mapping. Recheck your 2026 configuration whenever the source form or destination fields change.
FAQ
How do I connect Zapier to Archescrm?
Use a supported Zapier connector or a documented API connection through Webhooks by Zapier. Confirm the available operations and authentication requirements, then map and test a lead before publishing.
Do I need a native CRM connector to use Zapier?
No, a documented API can provide another connection route when it supports the required operation. A custom request still needs a valid endpoint, authentication, payload, and error-handling plan.
Can Zapier create both a contact and a deal?
Only when the connector or API supports both operations. Test each operation separately and preserve the identifiers required to associate the records correctly.
How do I stop a Zapier CRM integration from creating duplicates?
Use a supported lookup or documented duplicate-handling mechanism before record creation. Test a repeated source event and confirm that it does not produce an unintended additional record.
Can I update an existing CRM contact through Zapier?
Yes, when the source provides the relevant event and the destination supports identifying and updating the existing record. Define field ownership so incoming changes do not overwrite useful sales information.
Why does my Zap succeed but the sales follow-up fail?
A successful data transfer does not confirm ownership or follow-up activation. Inspect the resulting CRM record, its assigned owner, and the workflow conditions that control the next action.
What should I test before launching a Zapier CRM integration in 2026?
Test a new lead, an existing contact, and a submission missing required information. Also repeat an event and confirm that customer-facing messages remain disabled until the results are correct.
One last thing
Test the same submission twice before you call the integration finished. The first run checks whether the handoff works; the second checks whether the handoff remains correct when an event repeats.
A workflow that creates the right record once but duplicates outreach on a repeat is not ready for live leads.